9610 Commonwealth Ave., Jacksonville, FL 32220
Biscuit
BOAT:
Biscuit, a 1974 Cape Dory Typhoon
Project Detail:
Timeline:
Mid-October through TBD
Project Scope: Bottom job (stripped, barrier coat, and new antifoul), hull and deck paint, structural repairs, new brightwork fabrication, assembly and varnishing, mast and boom paint, new deck hardware, more tbd.

Project Hours:
Coaming Boards Part 2; Final Paint (4-27-25)
Apr 27, 2025
Before continuing work on the new coaming boards, I went below to continue work on painting the v-berth and bilge surfaces. I started first with taking a scouring pad to the bilge to scuff up the surface in preparation for the final coat of paint. I then turned to the balance of the v-berth, hull sides and overhead, and sanded those surfaces with 320-grit paper. After prepping the targeted surfaces for their final coat of paint, I brought the vacuum down and thoroughly cleaned the surfaces. I followed the vacuum with a solvent wash as the final prep prior to paint.
I prepared the paint supplies: 6" foam roller, brush, pan, and of course the TotalBoat paint. With my materials and tools brought to Biscuit, I began painting by working from the stem and finishing at the aft edge of the v-berth. I painted the bilge surfaces when I completed the overhead and forward portion of the v-berth. I then completed the hull sides and aft portion of the v-berth surfaces. I carefully backed my way out of the cabin and closed up Biscuit to protect the painted surfaces. The last of the interior paint will be the aft portion, or the quarter berths, as well as the cabin sole.
With Biscuit closed up, I turned to the port coaming board. Repeating the steps I took on the starboard coaming board, I oriented the original coaming onto the new coaming blank, and happy with the orientation I then clamped the board in place. I transferred the original coaming onto the blank and added just over an inch of height to the lower portion of the board by running a compass along the edge.
I removed the original coaming, cleaned up the cut lines, and then cut out the new port coaming board with a jigsaw and a carbide blade. With the new coaming board complete (rough cut form), I took it to Biscuit for a quick test fit - all good. I returned to the shop and clamped the new port coaming board to "work" the rough-cut edges. With a 24"-long Flexi-Board and 40-grit paper, I worked the top edge to ~97% fair, as well as the aft curves. Happy with that progress, I turned my attention to the boom
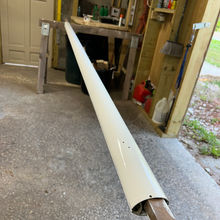
The boom is nearly complete - just requiring a final coat of paint and installation of the boom's new fittings. I started with sanding the boom with 320-grit paper, and then vacuumed and solvent-washed the surface. I poured a small amount of the TotalBoat Wet Edge topcoat paint and thinned it by ~3%. With a foam brush, I applied the final coat of paint (#4) to the boom. Boom fittings will come next, completing the boom. With that, I closed up the shop for the day.
Total Hrs: 4


