9610 Commonwealth Ave., Jacksonville, FL 32220
Biscuit
BOAT:
Biscuit, a 1974 Cape Dory Typhoon
Project Detail:
Timeline:
Mid-October through TBD
Project Scope: Bottom job (stripped, barrier coat, and new antifoul), hull and deck paint, structural repairs, new brightwork fabrication, assembly and varnishing, mast and boom paint, new deck hardware, more tbd.

Project Hours:
Repairs to the Coachroof
Jul 28, 2024
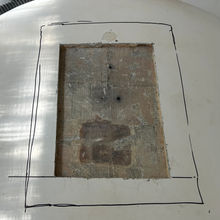
Over the weekend, and having just completed the shop's new roof on Friday, I sprang back into action on Biscuit. The task over the weekend was to continuing work on the substrate in preparation for application of the primer paint. There are a few areas of concern across the decks and coachroof that, while she was out of the water for a full refit, made sense to address and make right. Inspections were made to the side decks, just inboard of the chainplates - raised areas to the top skin that appear to be the result of rigging stress. These areas of the deck will be opened up to inspect for water damage to the core, and likely reinforced with solid glass instead of balsa core replacement. Additionally, the foredeck cleat had suffered some damage in the past, with repairs apparent. This location will also be opened up for inspection and to replace the core material, again with solid glass likely. The work over the weekend, however, was focused on the coachroof. More specifically, the area beneath where the mast step is installed. A previous repair was apparent here as well, and for such a critical element of the boat, it made sense to ensure structural integrity.
I began by identifying my cut lines, and then taking measurements of the location of three bolt holes to ensure that I return the mast step to its proper location. With an oscillating tool, I slowly worked my way around the perimeter of the cut line, and then removed smaller portions of the top skin until the entirety of it was removed. Again with the oscillating tool, I removed the balsa core which was fairly bright and dry aft of the opening and definitely discolored around the bolt penetrations. I cleaned up the area, removing not an insignificant amount of balsa core and fiberglass. With the work surface clean, I marked another perimeter line to then grind a taper to accept the new top skin material. I also ensured a good sanding on the bottom skin in preparation for a laminate layup.
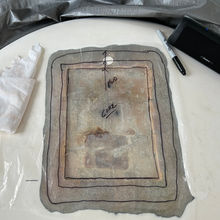
I vacuumed and solvent-washed the area thoroughly. With the repair area ready to rebuild and after measurements were taken, top skin opened up and balsa core removed, sanding and the grinding of a taper on the top skin, I set a sheet of plastic down and created template for new core material as well as top skin. I decided to omit balsa core and come back with laying up a solid core of 1708 biaxial fiberglass. With a solid fiberglass core, water intrusion would not be a future worry, and the added strength and rigidity for the mast step would be appropriate. Back in the shop, I applied the template to a roll of 1708 biaxial cloth and removed the eight pieces of cloth for the core, as well as the two top skin layers.
With "neat" epoxy, I wet out the surrounding balsa core and surface of the bottom skin, and then applied a thickened epoxy mixture of 406 colloidal silica and 407 low-density to the bottom skin surface, serving to fill in the weave of the balsa binder cloth "printed" onto the bottom skin during its layup. I then successively wet out layers of 1708 cloth and placed them into the cavity, building up a new structural core. I was surprised that I had cut and prepared a correct number of layers, bringing the new core up to the correct height in correspondence to the surrounding top skin. Before applying the new top skin, I prepared a another mixture of thickened epoxy, this time with 404 high-density filler and 406 colloidal silica, and pressed it into the smallish gaps between the new core and surrounding top skin. Finally, I skim coated the top of the core with this same mixture. Finally, I wet out the two tapering layers of 1708 biaxial cloth for the top skin, and laid them in place. A layer of peel ply would finish off the laminate work. In the coming days, after the fiberglass fully cures, a first layer of fairing compound will be applied.
Other tasks were also addressed over Saturday and Sunday, such as sanding the second round of epoxy fairing applied to the original rub and toe rail fastener holes. Measurements were also taken of the thru-hulls in preparation for their removal and replacement.
Total Hrs: 9


